Setting Up ASIO4ALL On Windows
In this article we’ll guide you through how to setup ASIO4ALL in your DAW. ASIO4ALL is a freeware universal audio driver for Windows .
If your audio interface already has a native ASIO driver, we recommend to use that. However, if your interface does not come with a native ASIO driver, or if you are experiencing issues using the current driver then you can use ASIO4ALL instead which will provide the best low latency performance when using Dubler
If your audio interface already has a native ASIO driver, we recommend to use that. However, if your interface does not come with a native ASIO driver, or if you are experiencing issues using the current driver then you can use ASIO4ALL instead which will provide the best low latency performance when using Dubler
ASIO4ALL setup
- Download and install the latest version of ASIO4ALL here
- Launch your DAWs audio preferences
- Select ASIO as the Driver type and ASIO4ALL v2 as the Audio Device (The names for audio device and driver type may vary slightly depending on your DAW)
- Open the ASIO4ALL settings. Again this can vary depending on your DAW, for Ableton you can do this by selecting Hardware Setup

For FL Studio you can select Show ASIO Panel
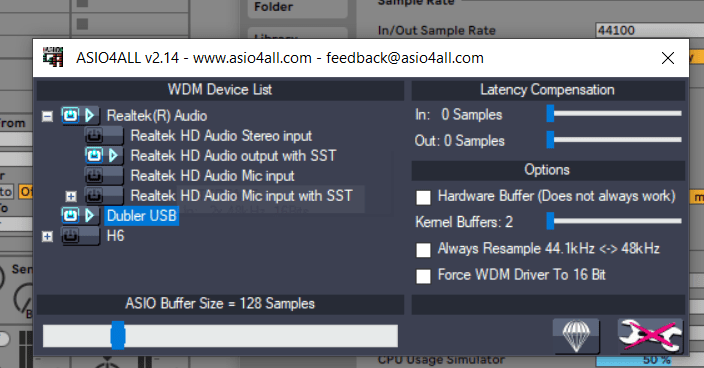
- You’ll now see the ASIO4ALL Window
- On the left hand side, click on the + next to your audio interface, then enable the inputs and outputs by clicking on the power button next to them. In the example screenshot we want to use the output from Realtek(R) Audio so the relevant output is enabled. The name of the interface will differ depending on your machine
- Make sure the ASIO Buffer Size is set to 128 Samples or below. You can change this by dragging the blue bar on the bottom slider

- If you want to use the Dubler mic as an audio input you can also enable it by selecting the power button next to Dubler USB. This is not necessary if you just want to use it as a MIDI input
- You can now exit the ASIO4ALL window, and it should be ready to use


