Reducing Latency On Windows
Windows will generally need a few additional adjustments to ensure the best low latency performance when using Dubler. The steps below will help you streamline Windows and have the best experience when using the Dubler Studio Kit.
Disclaimer: Vochlea can’t be held responsible for any issues that are caused by changing settings of your operating system.
Disclaimer: Vochlea can’t be held responsible for any issues that are caused by changing settings of your operating system.
Soundcard Settings
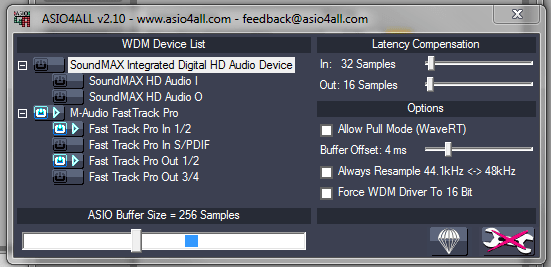
If you use a soundcard, in most instances, the best driver to use will be the one provided by the makers of the soundcard. This will ensure low latency. However if you’re having issues with your manufacturer driver, or you don’t have a soundcard you can use the third party driver ASIO4ALL which is able to download for free here.
You can find out how to set up ASIO4ALL depending on your specific DAW here:
Ableton: https://help.ableton.com/hc/en-us/articles/115000204630-Setting-up-ASI04ALL-Windows-
FL Studio: https://www.image-line.com/support/flstudio_online_manual/html/envsettings_asio4all.htm
ProTools: http://avid.force.com/pkb/articles/en_US/how_to/How-to-use-Pro-Tools-and-ASIO4ALL
In all of these cases you’ll also want to select Allow Pull Mode (WaveRT)

High Performance Mode
Windows sets all computers to a “Balanced” power plan by default. But there are also “Power saver” and “High performance” plans.
You’ll want to enable the High performance power plan. Although this uses more energy it will increase the performance of your DAW and also Dubler.
To do this open Control Panel and go to Power Options. Then select High performance.
You’ll want to enable the High performance power plan. Although this uses more energy it will increase the performance of your DAW and also Dubler.
To do this open Control Panel and go to Power Options. Then select High performance.
If you can’t see the High performance in your control panel you can use this workaround:
In the Taskbar right-click the battery icon, then click Windows Mobility Centre. In this window you’ll be able to select the High performance power plan. (Once this is done, the option will now appear in your control panel as usual.)
In the Taskbar right-click the battery icon, then click Windows Mobility Centre. In this window you’ll be able to select the High performance power plan. (Once this is done, the option will now appear in your control panel as usual.)
Turning off Sound Enhancements
Sound enhancements built into most computers can lead to latency when using Dubler. To turn off the sound enhancements, follow the steps below:
Windows 10, 8
- Close all programs, including classic SmartMusic.
- On your computer keyboard, hold down the WINDOWS key + R to open the Run dialog box.
- In the Run dialog box, type “control panel” and press ENTER.
- In the Control Panel, navigate to Hardware and Sound > Sound.
- Choose the Playback tab, right-click on your default audio device and choose Properties.
- Choose the Enhancements Tab, and check the box to Disable All Sound Enhancements.
- Choose the Advanced Tab. Under Default Format, choose 16-bit, 44100 Hz (CD Quality) from the drop down menu.
- Click Apply and OK. Close all other open windows.
Windows 7
- Close All programs
- Click Start Orb > Control Panel > Hardware and Sound > Sound > Playback Tab > Right-click on your audio device and choose Properties > Enhancements Tab
- On this tab, check the box to Disable All Sound Enhancements.
- Switch to the Playback Tab > in the Default Format pull down menu, choose 16-bit, 44100 Hz (CD Quality)
- Click Apply and OK. Close all other open windows.
Vista
- Close All programs
- Click Start Orb > Control Panel > Hardware and Sound > Sound > Playback Tab > Right-click on your audio device and choose Properties > Enhancements Tab
- Switch to the Playback Tab, and in the Default Format pull down menu, choose 16-bit, 44100 Hz (CD Quality)
- Click Apply and OK. Close all other open windows.
(Thanks to /makemusic.zendesk.com/ for this list)


