Pitch And Control Settings
Dubler includes various features to convert input singing to output MIDI notation.
This page covers pitch feedback and pitch settings. You can find a separate page on note restriction and key fixing here.
Pitch Wheel
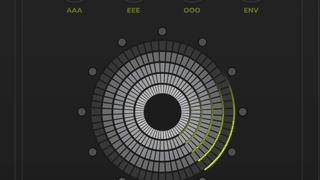
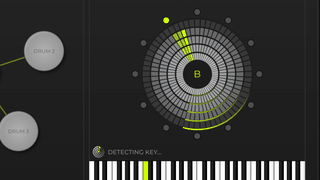
The pitch wheel gives you feedback on the pitch you’re singing and the corresponding note that is being sent out to your DAW.
The centre of the wheel shows the note being output to the DAW e.g. “A♭”.
On the outer circle of the pitch wheel there are evenly spaced dots. Each dot represents a note in the traditional western chromatic scale (A, B♭, B… etc). The top dot represents a C. Moving clockwise around the wheel each dot represents an incremental musical step. There are 12 dots representing a full octave.
The ‘spokes’ that fan around the wheel light up green according to the input pitch and envelope. They act like a compass pointing towards the note your input singing is closest to. This is a great way to see if you are singing flat or sharp.
Piano Keyboard
The output notes are also displayed on the piano key roll at the bottom right-hand side of Dubler.
The keyboard will show if you have any key restrictions applied and, if you have chords activated, which additional notes to the root note are being sent to your DAW.
If you click on a key on the piano keyboard you can deactivate that note. For more on this see the section on key fixing.
Control Settings
To access the pitch control settings click either on the pitch wheel or generally on the right hand side of the Dubler app.
Pitch Stickiness and Input Level
You can adjust the pitch stickiness and Input Level to your personal preference to improve the accuracy of the pitch to MIDI.
Pitch Stickiness determines how close you have to get to another note before the MIDI information will change. A high pitch stickiness will make it easier to hold a note but also harder to change from it.
The input level allows for a more accurate control depending on singing or input style. A higher input level will pick up more information from your voice and would be recommended for quiet singing or humming. Higher input level can be more susceptible to background noise and a lower input level might be preferable for louder singing styles with noisy backgrounds.
Try adjusting these two settings together to see what fits best for you.
Octave Shift
Dubler detects the octave of the note you’re singing. You can adjust this using the octave shift function, for example lowering your voice by an octave to sing bass lines.
Quick Tip: If you’re whistling you’ll probably want to apply an octave shift or two down. Also make sure not to whistle directly into the Dubler mic (as that will be very noisy with all the air blown onto the microphone capsule). Try whistling near, but not directly into, the microphone.
Pitch Bend
Pitch Bend allows you to bend the pitch of a note with your voice, the same as you would with a pitch wheel on a MIDI keyboard. Pitch bend works over a range – where the range number represents how many notes away from the original note you can bend.
E.g. with a pitch bend range of 2 if you start singing a C and then bend your voice up, you can bend 2 steps, as far as a D, before a new note is triggered in your DAW.
Note: The really important thing here is to make sure the pitch bend value in Dubler matches the pitch bend range on the MIDI instrument or plugin in your DAW. If these numbers don’t match then the output pitch from your DAW won’t match the input pitch of your voice.
MIDI Channel
As a default Dubler outputs pitch information to MIDI channel 1. You can change that setting here.