How To Add Triggers
The Triggers functionality in Dubler allows a user to trigger samples in their DAW by making percussive input sounds; such as beatboxing, clicking or clapping.
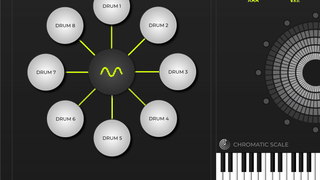
Each sample or note in your DAW is controlled by a specific Trigger in Dubler. Therefore to control a new sample in your DAW you need to add a corresponding Trigger in Dubler.
To do this you need to teach Dubler what input sound you want to use to control that sample.
Add a new Trigger
First, select the large plus button the left. This will add the first trigger above it.
The first trigger that appears will be initially assigned to the MIDI note 36 C1 (Bass Drum 1).
You can change what MIDI note the trigger applies to on the NOTE drop-down menu.
MIDI Notes explained
The MIDI note drop-down menu is labelled by instrument, however this may not be completely accurate depending on what plugin or sample pack that you are using. In the example 36 C1 (Bass Drum 1) the 36 C1 refers to the MIDI note that the trigger is sending out. In most drum racks C1 is normally assigned to a Kick, however you should check depending on the plugin or rack you are using.
Once you have selected the desired MIDI note output, it’s time to teach Dubler the sound you want to use to activate the trigger. Hit REC and repeat the sound to give Dubler a few examples.
Each time you give a successful example to Dubler, one of the circles on the right will light up. You can give a maximum of 12 examples per trigger. If you find you are often lighting up circles when you didn’t intend to, consider clicking ‘General’ and reducing the Trigger sensitivity.
If you’re not happy with the sounds you have recorded you can hit trash ALL to clear the bank and start again.
Quick Tip: The examples you give for each Trigger need to be consistent, so that ultimately that specific input sound will activate that specific Trigger.
Finally you have the option to turn on/off Velocity Control. Dubler has the ability to set the velocity of the samples you trigger through the velocity of your input sound. For some samples though you might not want that behaviour so here you can turn off Velocity Control. The result will be that Dubler always triggers that sample at full velocity.
Once you are happy with your new Trigger you can either click the Add Triggers + to add more sounds or click the ‘x‘ to leave Trigger training.
Quick Tip: Each different Trigger should be controlled by a distinct input sound. If two Triggers are controlled by a very similar sound Dubler won’t know which one you’re intending to activate. As you get more consistent with your input sounds you can train new profiles with Triggers that sound more similar.
Check out our Tips for Triggers page to learn how to get the most out Triggers in Dubler.