Latency
What is latency?
Audio latency refers to a short period of delay (usually measured in milliseconds) between when an audio signal enters and when it emerges from a system. With the Dubler Studio Kit, this will be the time between you making a note with your voice, and when you hear the sound come from your system.
Note: While it’s possible to reduce latency, it’s impossible to eliminate it entirely.
Where latency occurs
Latency is added at each different step of the audio chain. Below is a diagram to demonstrate the different steps where latency can occur.
How to reduce latency
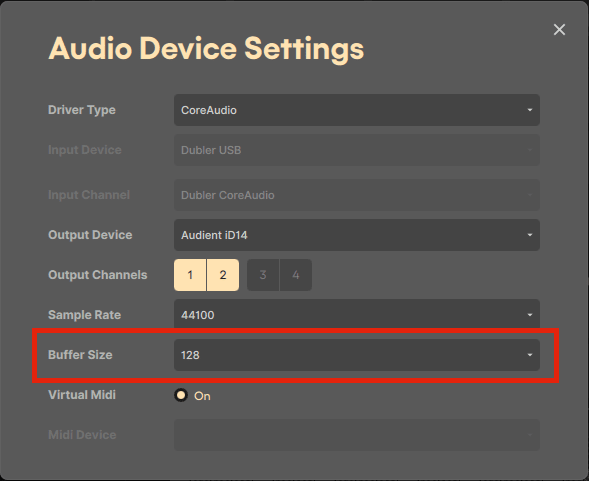
Reduce the buffer size
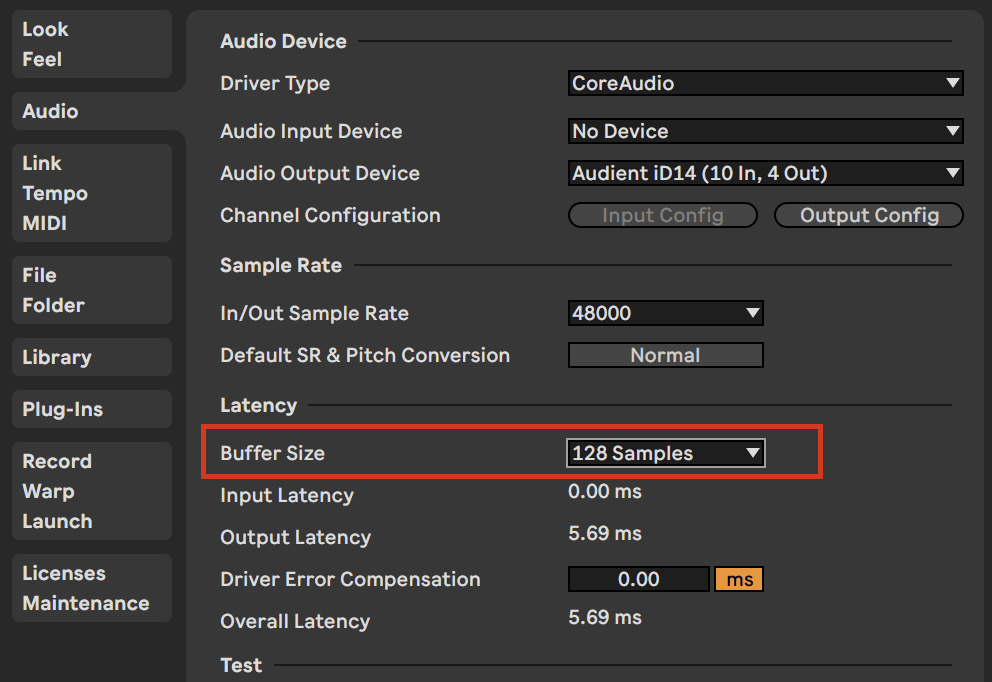
The first step in reducing latency should be making sure your buffer size is at 128 samples or below in both Dubler and your DAW. In Dubler you can set the buffer size via the audio device settings which you can access by clicking on the cog in the top right.
Changing the buffer size will vary slightly depending on your DAW, however in general you'll want to navigate to your DAW's audio preferences and set the buffer size within there. Some DAWs may call it 'Buffer length' or 'Buffer rate.'
Using a low latency audio driver
If you're on Mac, the in-built CoreAudio can handle low latency performance and so you can set the buffer size to 128 samples or below as mentioned above. However if you're on Windows, Windows' default drivers such as MMX or Realtek drivers can't handle the low latency performance required to use Dubler. For the best performance we recommend using an audio interface that comes with it's own ASIO drivers, however if you don't have an audio interface you'll need to use ASIO4ALL to get low latency and set your buffer size to 128 samples or below.
You can find our page on setting up ASIO4ALL here.
Once you have an appropriate audio driver set in your DAW, make sure the buffer size matches in both the drivers control panel as well as in your DAWs audio preferences.
Reduce the CPU load
Very small buffer sizes may cause dropouts or glitches due to the increased CPU load. Reducing the overall CPU load of the computer will allow for smaller audio buffer sizes. Here are some tips on how to reduce the CPU load—
Check your Activity Monitor (Mac) or Task Manager (Windows) to see if other applications are using a lot of CPU, then close these applications
Bounce, freeze or render tracks that are using CPU intensive plugins
Make sure your computer is well ventilated, with an adequate flow of cool air around your computer
There are a whole host of other ways to reduce your CPU load, check online to find more specific tips for your set-up.
Input style
The way you sing melodies and voice triggers can occasionally impact on the responsiveness, and consequently increase the latency. Remember to be clear and confident when voicing melodies so Dubler can detect a recognizable pitch as quickly as possible. One tip is to use percussive sounds at the beginning of notes which can help with Dubler's responsiveness. For example singing a melody like 'Daa Daa Daa' instead of 'Aaa Aaa Aaa' can make the note start more obvious to Dubler.