Performing Complex and Melodic Chord Progressions with Chord Randomization
8 min read • 5th May 2021
In this article we use MIDI chord-shape randomization tricks in Ableton while improvising with Dubler to generate unique chord progressions.
There are multiple ways to do this and we’re going to demonstrate the technique using a Rhodes sound and a pad sound. We also released a Youtube video walking through all of the steps in this article and you can check that out here!
Chord and Scale MIDI Devices
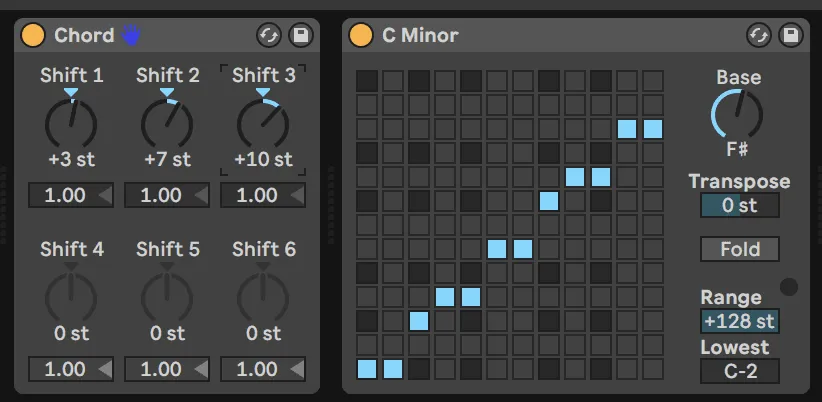
Most DAW’s have a Chord or Chord Trigger MIDI device that allows you to add layers of notes to any MIDI note fed through the device. The way Ableton’s works is adding up to six additional note intervals. For example if you’re singing a C note with Dubler and the chord device has +3 semitones (st) and +7 st you’ll get a chord with C, Db and G - this is a C minor triad.
If you added a third interval knob with +10 you’d get a Bb, so that would make this chord a C minor 7 chord shape. This chord shape stays the same no matter what note you sing through, so if you sang a G note with Dubler with this chord shape active, you’d get a G minor 7 chord (G - Bb - C - F).

The only issue with this is staying in key, as chords in one single scale can’t all have the same exact shape or there will be lots of notes that leave the key. The solution to this is adding the Scale MIDI device afterwards! If you’re working in a minor scale, use the Scale device’s ‘C Minor’ preset and if you’re working in a major scale use the ‘C Major' preset. Then you just edit the ‘Base’ knob to get the correct root note. In our example we have Dubler set to F# minor so we set the Scale device to F# minor as well, using the C minor preset and changing the Base to F#.
Automating the Chord Knobs
To randomize the chord shapes so that they constantly change, all you have to do is draw in continually changing automation for any number of the six chord shift knobs. To do this, you right click the knob, click on ‘Show Automation’ and then draw your automation. In our example in the video, our chord device has three set intervals that aren’t automated (+3, +7,+12) and we only automate two of the three remaining shift knobs.
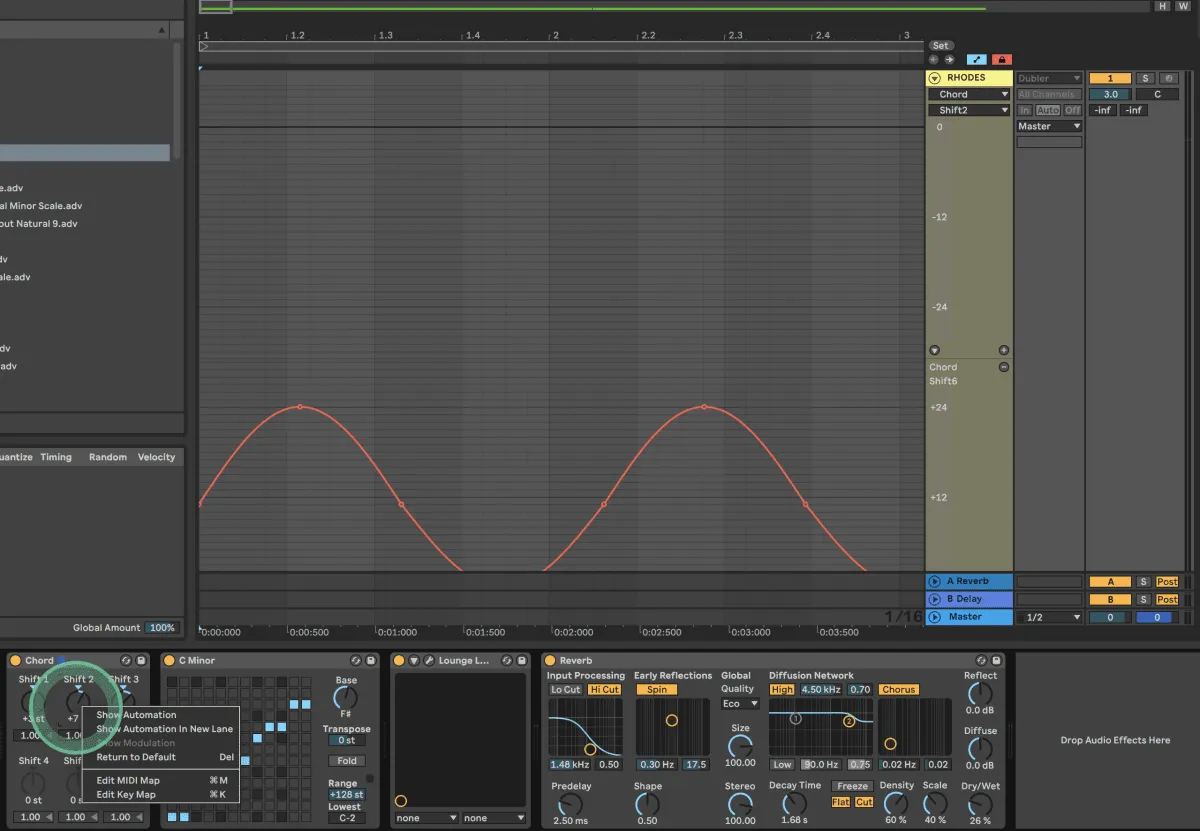
Because this is a pitch-related parameter, when you click ‘Show Automation’ you’ll see a large range all the way from -36 to +36 semitones. When drawing your automation make sure all values stay above 0, so that you never hit any notes lower than the chord’s root note.
A quick way to draw in automation is to click and drag a space in the timeline, right click and select and automation shape. We used the Sine-wave shape and duplicated it many times using the Command/Ctrl+D shortcut.
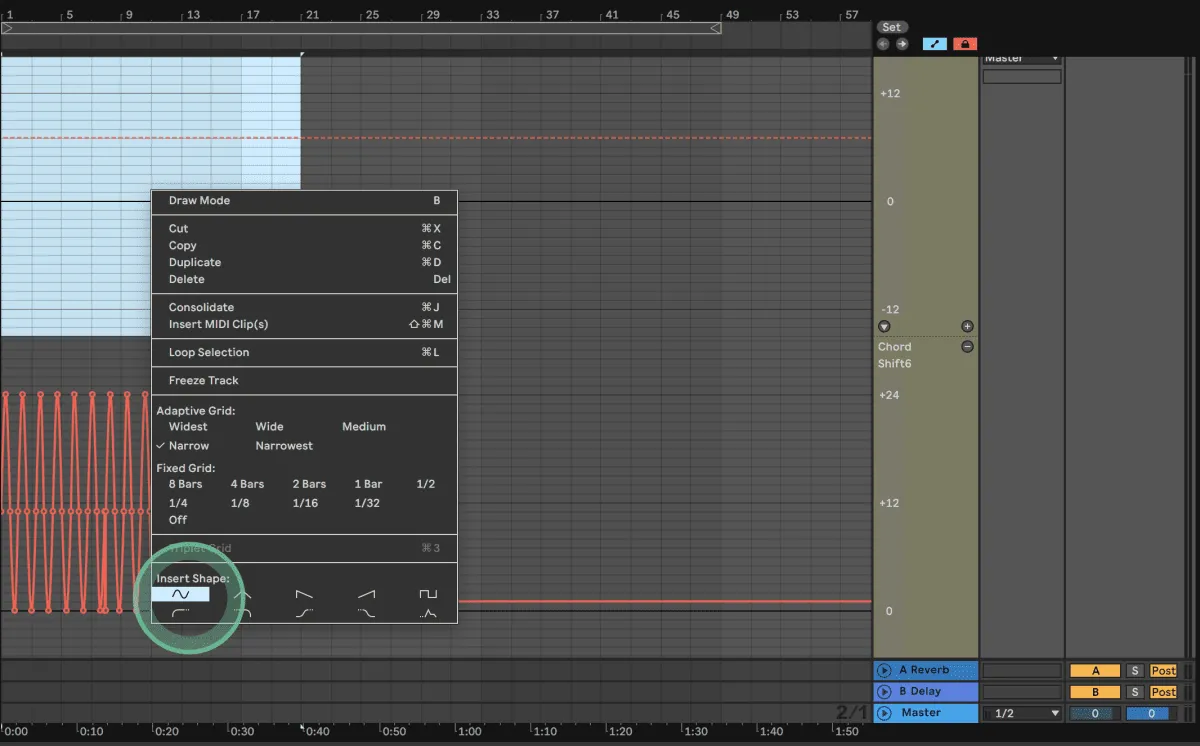
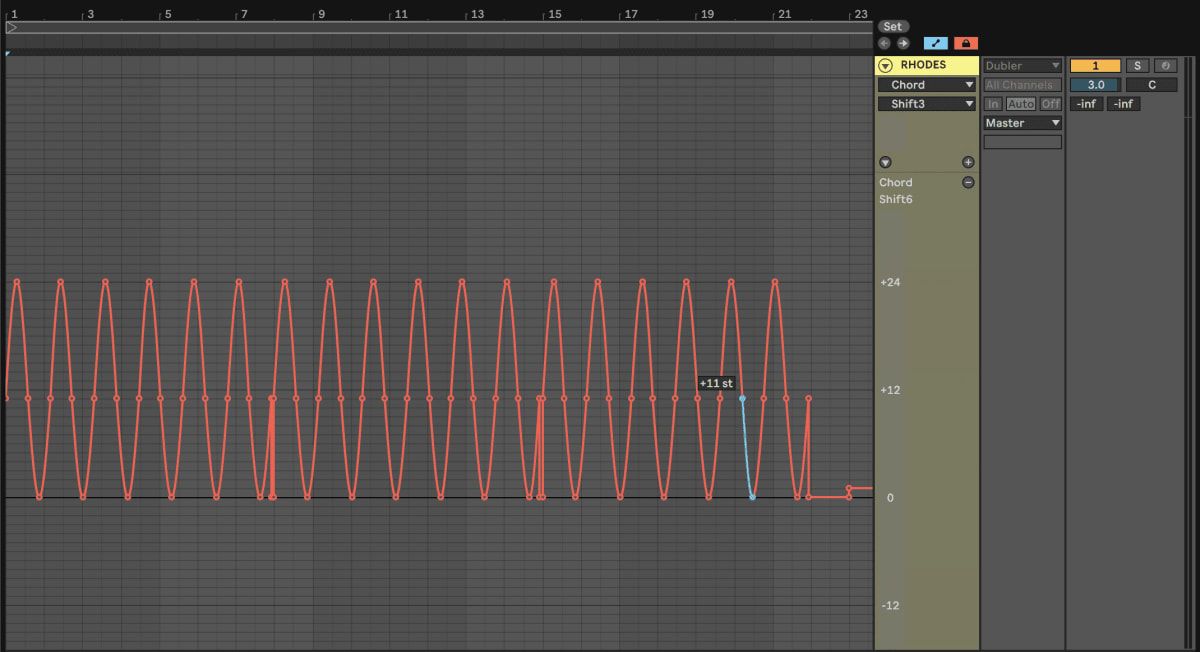
For the second knob we automated we copy pasted the automation envelope from the first but dragged it slightly to the left so that both knobs don’t hit the same notes at the same time.

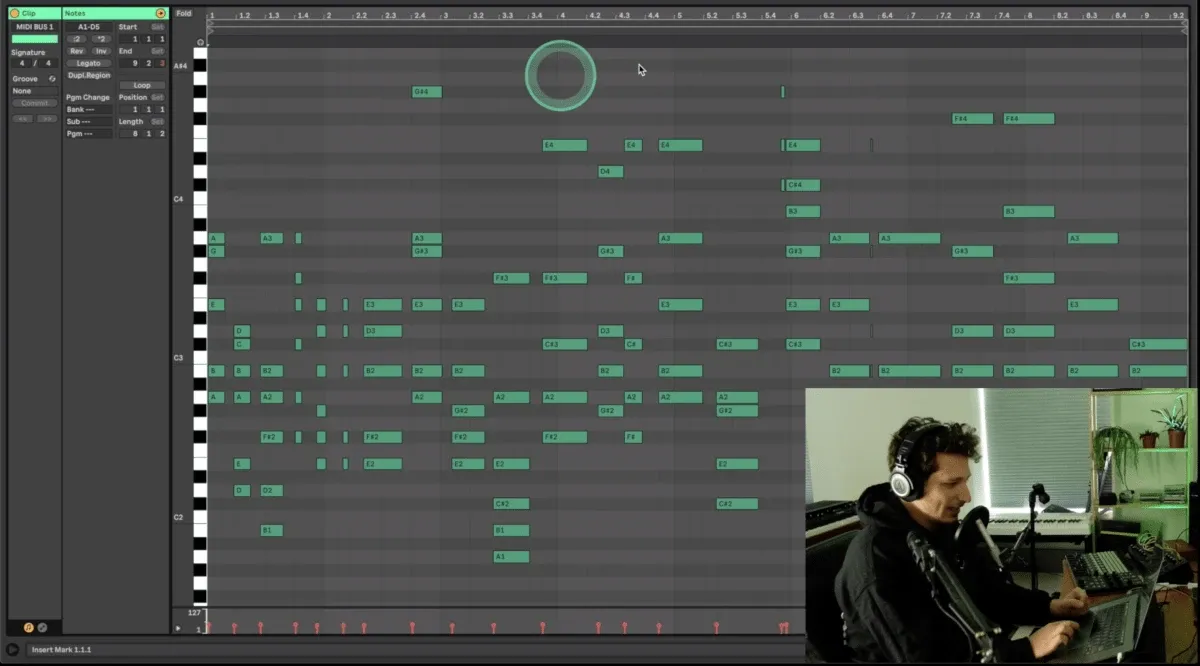
With this set up, now when we press play and move through our timeline two notes in the MIDI Chord Device will be constantly changing but remember that all of these notes are staying in key thanks to the handy Scale Device.
We first tried this out by repeatedly singing just one note into Dubler while the chord shape changes:
You can already hear lots of melodic phrases and different types of chord combinations even though we’re only singing one note!
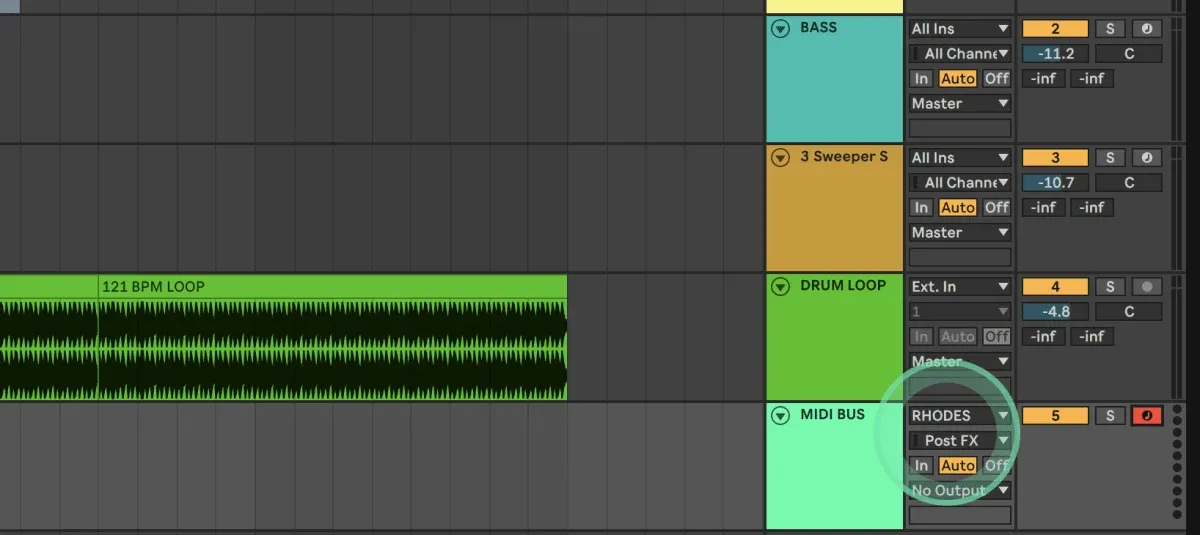
For the second example, we created a new MIDI channel with a bass loaded and record-armed both the Rhodes channel and the bass channel to be able to perform them both at the same time. The bass channel has no chord MIDI device, so it is only layering the root note of each chord. Here’s how this sounds:
With this one we sung a variety of notes so the chords are a bit more all over the place, but the goal of this technique is not to sing long successful passages. It is more about finding moments, loops and even melodic ideas that you can use to get a track going!
Capturing the Full Chord MIDI
One of the most annoying aspect of recording with MIDI effects like chord devices and arpeggiators is that you don’t see the full MIDI in front of you after you press record, because technically you’re only recording single notes that are then being fed through MIDI effects. It would be great to be able to edit the individual notes of each chord that you get using this technique - and you can!
All you have to do is create a new MIDI channel and in its ‘MIDI Input’ dropdown list select the channel you want to capture the MIDI from. In our example, we selected the Rhodes channel in the dropdown list. You then just need to record arm this new MIDI channel, hit record and watch as it captures all of the MIDI from the selected input channel.

Automation with Max For Live
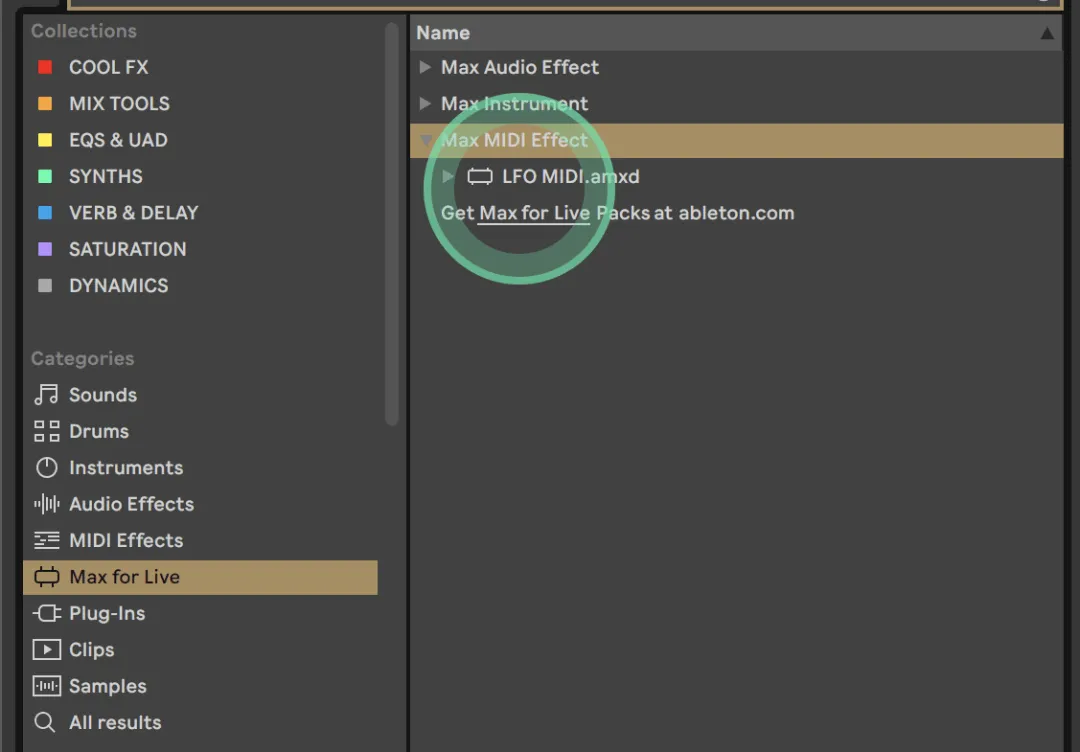
Lastly, let's look at one more way to automate the Chord MIDI device. This method is less time consuming than drawing envelopes in manually, but it requires a Max for Live MIDI effect that is only available with Ableton’s most comprehensive version, Live Suite.
If you have Live Suite and Max for Live installed, you’ll see a Max for Live tab at the left in Ableton. Under MIDI effects find the LFO effect and drag two of them to your instrument’s channel. In our example we used a pad preset of Ableton’s Sampler.
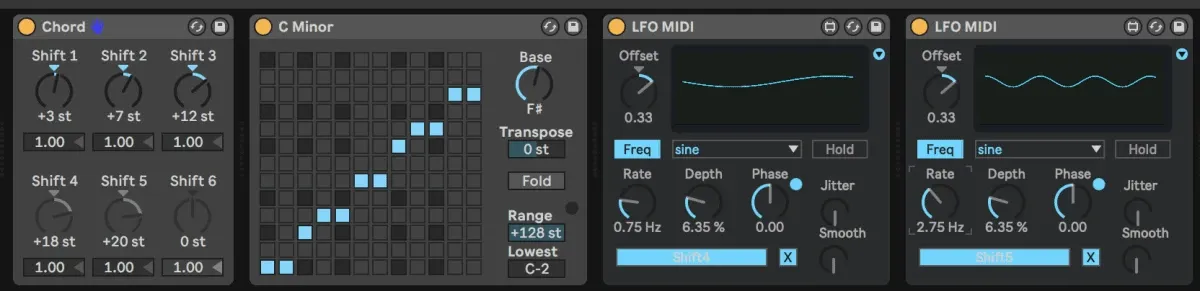
The LFO MIDI Device can be used to continually automate any parameter in Ableton. It has a big Map button that you press and then you need to click the desired parameter to map it. We mapped both LFO’s to two of the Chord devices shift knobs. Once this is done, they knobs will both become greyed out but they will also start to continuously move. You can edit the movement by tweaking the shape, rate, depth and offset parameters in the LFO’s.
Remember to prevent the knobs from going below 0 st, or your chords will have random root notes, which could actually also be a good thing in terms of getting results with randomization!
Here’s a quick trial of this technique with Dubler and our pad sound: