ASIO4ALLの使用
This content is hosted by YouTube and may set cookies.
Please Note: If the video here does not play it is likely that ASIO4ALL is already select in another application. Please follow along with the written article and screenshots below.
In this page we’ll guide you through setting up ASIO4ALL with the Dubler microphone, setting up ASIO4ALL with your microphone, and using ASIO4ALL with your DAW.
In order to get low latency when using Dubler we need to use an audio driver that can handle this low latency performance. Window’s own inbuilt drivers can’t do this so we need to use ASIO drivers
Most audio interfaces come with their own dedicated ASIO drivers, which is what we strongly recommend using for the best experience. However if you don’t have an interface that comes with it’s own drivers we can use ASIO4ALL
ASIO4ALL allows you to select the input and outputs you want to use for each app as well as adjusting the buffer size. For example, you can set your output in your DAW using ASIO4ALL, or use it to set a mic as an input in Dubler 2 if you do not have an audio interface or Dubler USB mic.
Setting up ASIO4ALL with the Dubler USB Mic
If you're using the Dubler USB, we'll just need to setup ASIO4ALL to only use our output.
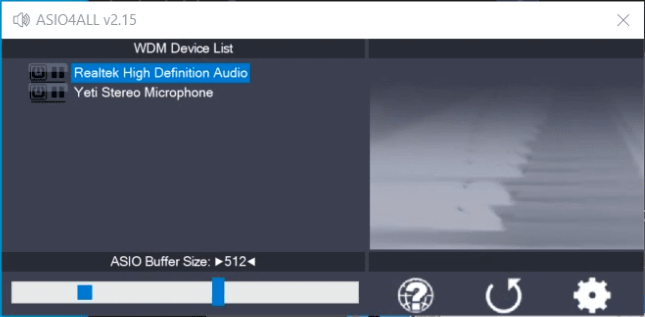
1. First open the ASIO Control Panel.
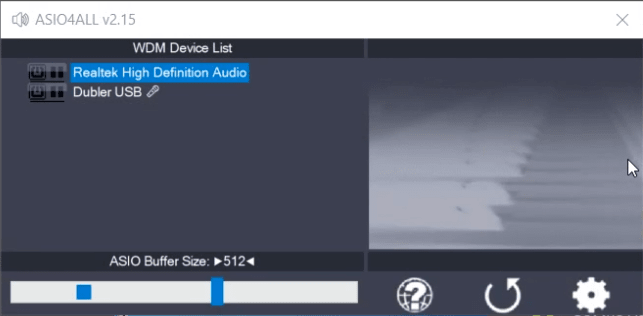
In this panel you'll see a list of all the devices you have connected to your computer. In the screenshot above we have the Dubler USB mic and our in-built speakers and mic listed as 'Realtek High Definition Audio.' This list will change depending on the devices / computer you are using. In this panel we want to turn OFF all inputs, and turn ONLY the output we want to use ON
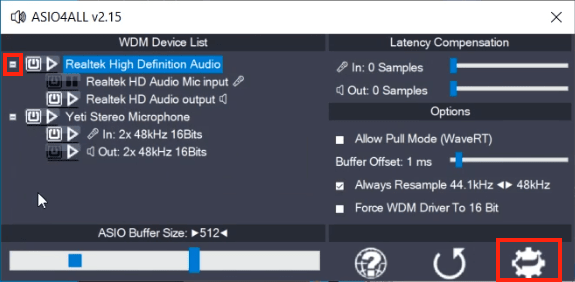
2. Click the cog in the bottom right to open the advanced view, and you'll then be able to click plus next to each device to view the inputs and outputs of that device. If there is no plus button next to the device it means it is either just an input or output (As shown by the mic or speaker icon next to the name)
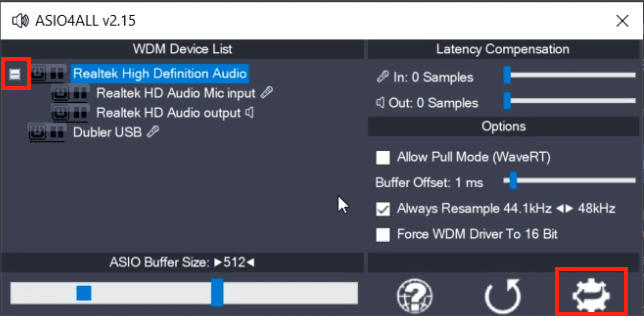
3. Turn OFF any power button that you do not want to use. Remember we want ONLY the output to be turned on. In this screenshot we want to use our in-built output so we'll turn on the device 'Realtek High Definition Audio' and turn on the output 'Realtek HD Audio output'
The Dubler mic should NOT be on, as we don't want to use it through ASIO4ALL. The mic has it's own drivers which the app uses
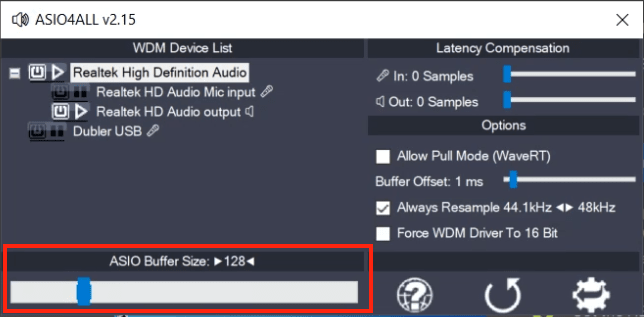
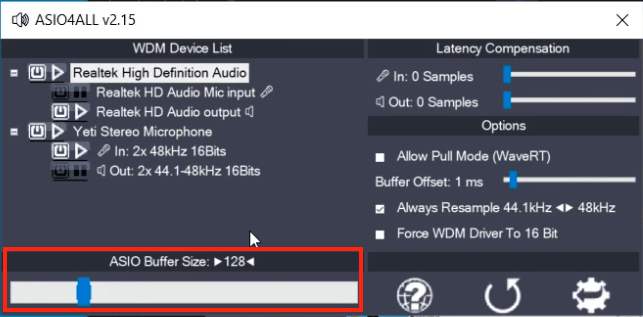
4. Drag the blue bar at the bottom to the left until the ASIO Buffer Size is at 128, which will reduce any latency.
ASIO4ALL is now configured correctly to use with Dubler and you can close the panel.
It's worth nothing that one of the main limitations in using ASIO4ALL is that only one application can use an input or output in ASIO4ALL at a time. So that means if you are using ASIO4ALL to take the input from a mic in Dubler, you can’t use the same mic as an input in our DAW. Or in the same way if you are using ASIO4ALL to select the output in our DAW, you can’t use that same output to hear sounds in Dubler. That doesn’t prevent you from using Dubler to make music in any way, but just prevents you from using Dubler’s in-built audio and audio from your DAW at the same time.
Setting up ASIO4ALL with your own mic
If you're using the Dubler USB, we'll just need to setup ASIO4ALL to select your mic and chosen output.
1. First open the ASIO Control Panel.
In this panel you'll see a list of all the devices you have connected to your computer. In the screenshot above we have a Yeti Microphone connected and our in-built speakers and mic listed as 'Realtek High Definition Audio.' This list will change depending on the devices / computer you are using. In this panel we want to turn OFF any inputs we aren't using, and turn ONLY the mic and output we want to use ON
2. Click the cog in the bottom right to open the advanced view, and you'll then be able to click plus next to each device to view the inputs and outputs of that device. If there is no plus button next to the device it means it is either just an input or output (As shown by the mic or speaker icon next to the name)
3. Turn OFF any power button that you do not want to use. Remember we want ONLY the input and output we want to use to be turned on. In this screenshot we want to use our in-built output so we'll turn on the device 'Realtek High Definition Audio' and turn on the output 'Realtek HD Audio output' and turn off the mic. We'll then open the Yeti microphone and turn OFF the output as we only want to use our in-built speakers. As mentioned before some mics won't have an output so this won't always be necessary.
4. Drag the blue bar at the bottom to the left until the ASIO Buffer Size is at 128, which will reduce any latency.
ASIO4ALL is now configured correctly to use with Dubler and you can close the panel.
It's worth nothing that one of the main limitations in using ASIO4ALL is that only one application can use an input or output in ASIO4ALL at a time. So that means if you are using ASIO4ALL to take the input from a mic in Dubler, you can’t use the same mic as an input in our DAW. Or in the same way if you are using ASIO4ALL to select the output in our DAW, you can’t use that same output to hear sounds in Dubler. That doesn’t prevent you from using Dubler to make music in any way, but just prevents you from using Dubler’s in-built audio and audio from your DAW at the same time.
Setting up ASIO4ALL as an output in your DAW
Launch your DAWs audio preferences
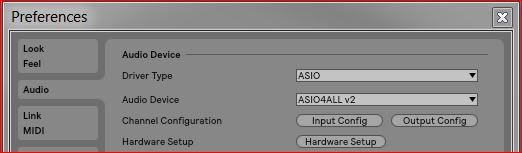
Select ASIO as the Driver type and ASIO4ALL v2 as the Audio Device (The names for audio device and driver type may vary slightly depending on your DAW)
Open the ASIO4ALL settings. Again this can vary depending on your DAW, for Ableton you can do this by selecting Hardware Setup
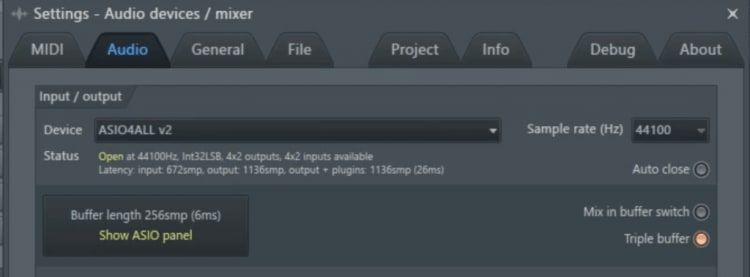
For FL Studio you can select Show ASIO Panel
You’ll now see the ASIO4ALL control panel
Click the cog in the bottom right to open advanced view
On the left hand side, click on the + next to your audio interface, then enable the inputs and outputs you want to use by clicking on the power button next to them. In the example screenshot we want to use the output from Realtek(R) Audio so the relevant output is enabled. The name of the device may differ depending on your machine
Make sure the ASIO Buffer Size is set to 128 Samples or below to reduce latency. You can change this by dragging the blue bar on the bottom slider

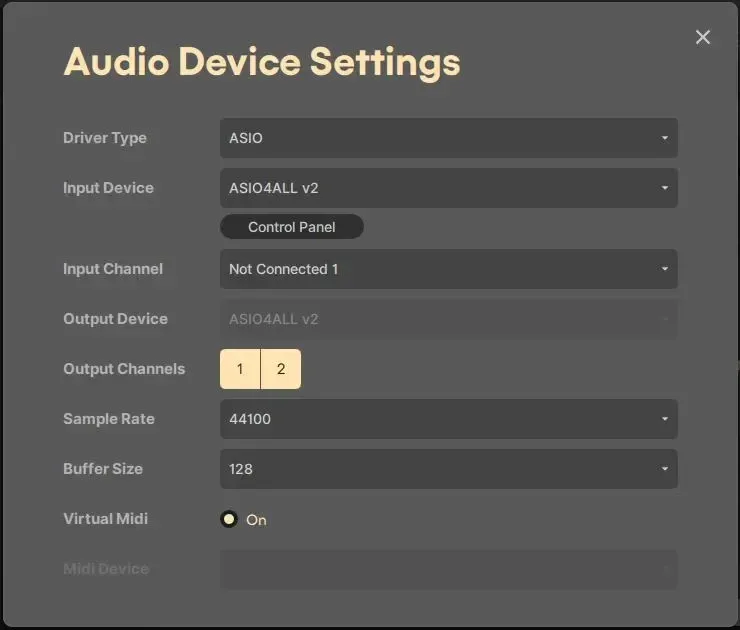
IMPORTANT: ASIO4ALL can only use an output through one application at a time. This means in order to make sure your output is working turn OFF the output within Dubler. You can can do this by accessing the audio device settings and opening the control panel to turn off the output in Dubler's ASIO panel.