Setting Up Live Streams and 9 Live Performance Techniques for Dubler in Ableton
所要時間14 分 • 19th Apr 2021
In this article we list nine techniques that you can use while performing live with Dubler, while also looking at live-oriented MIDI controllers and the software needed to set up a live-streaming show.
The Software Required to Stream a Performance
Real gigs are generally off the table right now due to Covid-19 but musicians have responded to this by embracing live-streamed performances more and more. In fact, it has become so popular that the industry has had to introduce new royalty-related guidelines with regard to income generated from streamed gigs or performances.
Setting up a livestream may seem like a daunting technical task, but there are two programs that make it very easy!
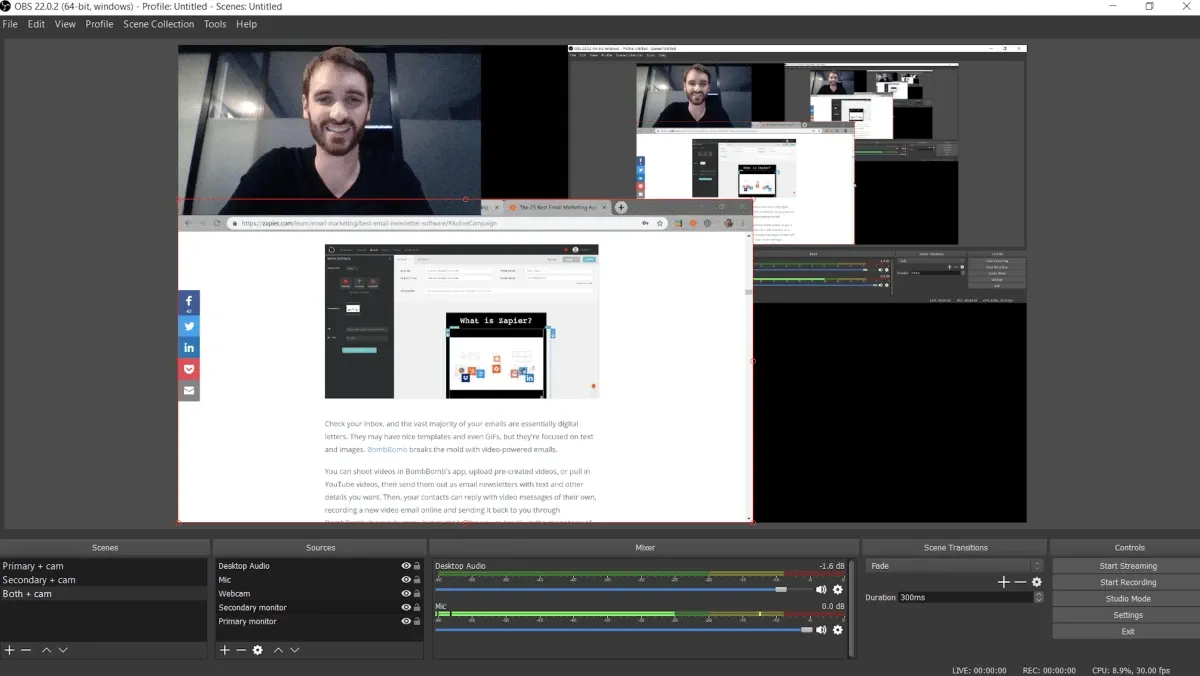
The first of these is OBS, which you use to combine all of the visual and audio sources for your stream. For example, you could combine a video with visuals playing via Quicktime Player, live-footage of yourself via your webcam or an external camera, and finally the audio from your DAW. OBS then allows you to route the entire feed straight to whichever streaming platform you would like, including Facebook, Twitch and Youtube.
Here’s the link to download OBS and here’s a great tutorial about setting it up.
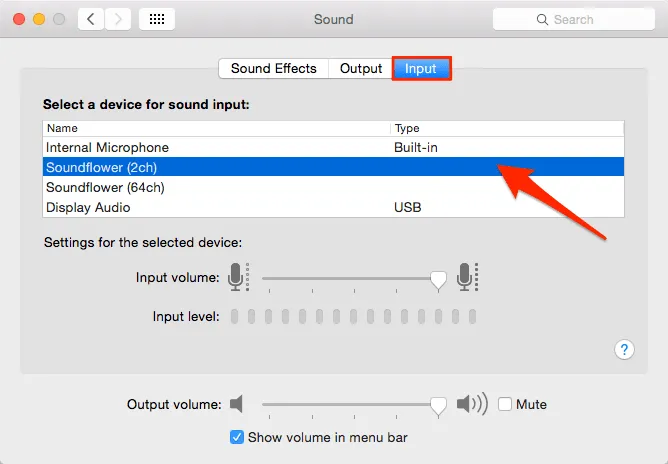
The second piece of software required is Soundflower, which is an audio device that acts as an internal soundcard in your computer. In a live-streaming context it would be used to split audio outputs so you can have multiple outputs. This is necessary because, during a performance, you need to send your audio both to OBS and to your headphones/speakers simultaneously so that you can hear yourself while you perform.
Here’s the link to download Soundflower along with a tutorial about how to install and use it.
MIDI Controllers Designed for Performances
It is very possible to manage a whole live performance with just your DAW and Dubler but there are certain MIDI controllers that make everything easier while providing a more visually satisfying experience. People don’t want to watch someone just mess with a mouse-pad!
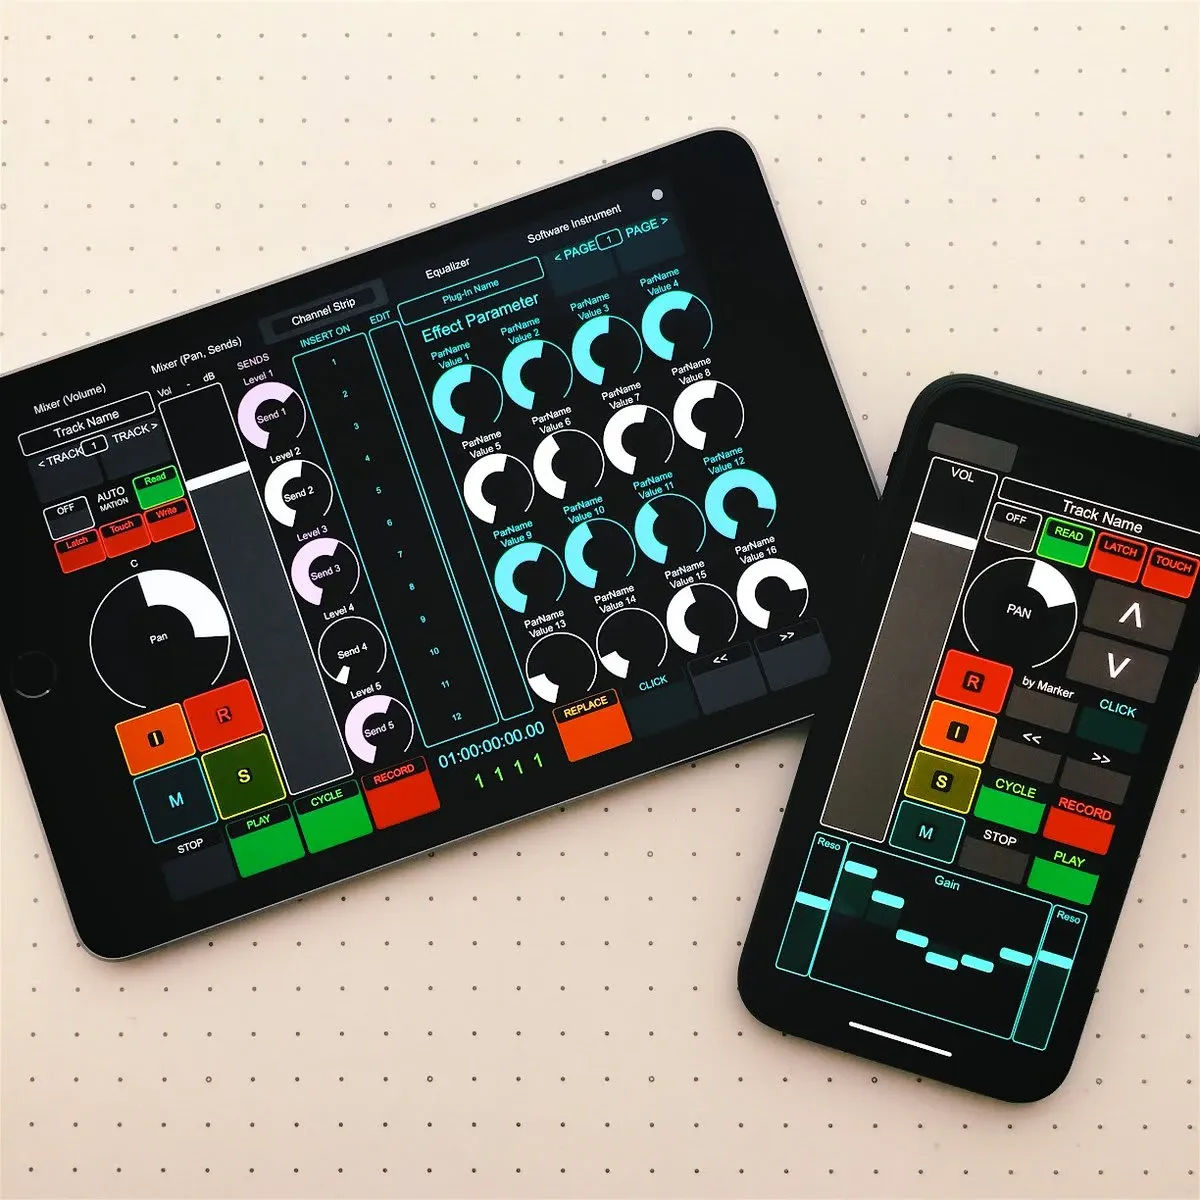
In our video demonstrating live techniques with Dubler we used AKAI’s APC mkII controller, which was designed to be a physical version of Ableton Live’s Session View interface.
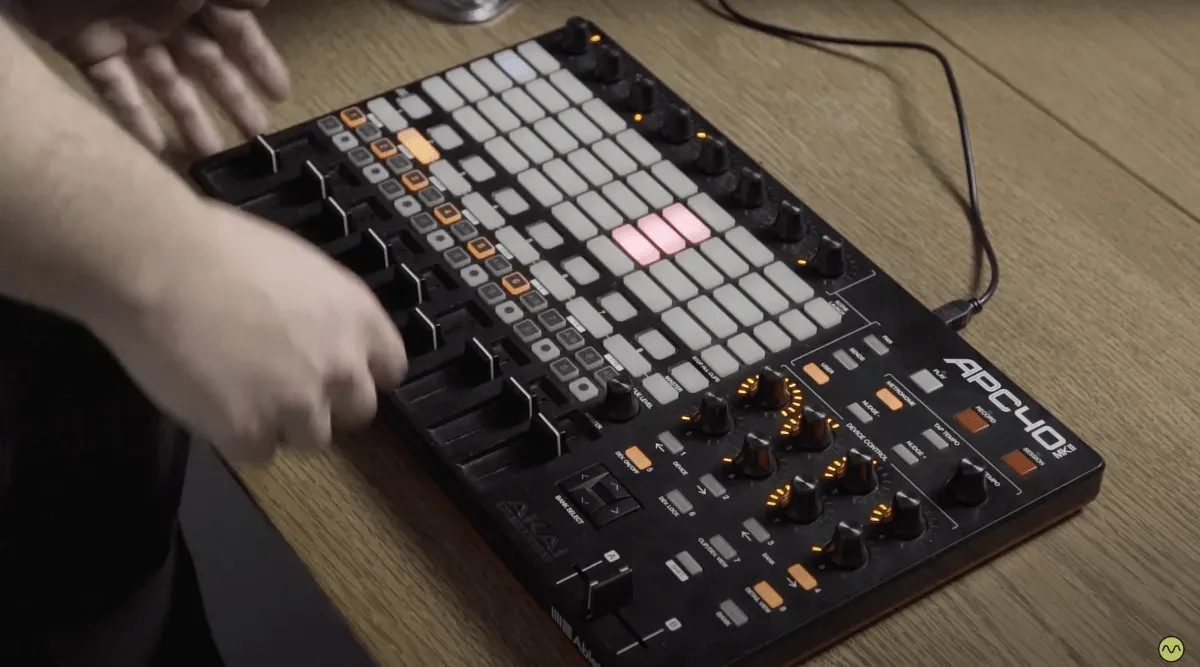
This controller essentially allows you to control Ableton without having to use your mouse. It has eight channels with a fader and mute, solo and record-arm button for each. There is also a fader for the master channel and buttons to launch scenes in the master fader. Each channel has five clip slots each and you can use these to launch loops in real-time during your performance.
The eight knobs to the right automatically map themselves to any internal Ableton effect selected and the eight knobs at the very top above the channels can be MIDI mapped to any parameter. There are also other useful buttons and knobs like a button to toggle the metronome on and off and a master tempo knob you can use to change BPM.
There are many Ableton-friendly MIDI controllers on the market and here is a list of some of the best.
It is also worth mentioning that there are iOS and Android apps that work as MIDI controllers via bluetooth. These are much cheaper than physical controllers and they are more flexible because many of them allow you to design your own interface. One example is TouchOSC by Hexler.
Now back to Dubler!
Live Technique 1 - Switching Between Multiple Instruments
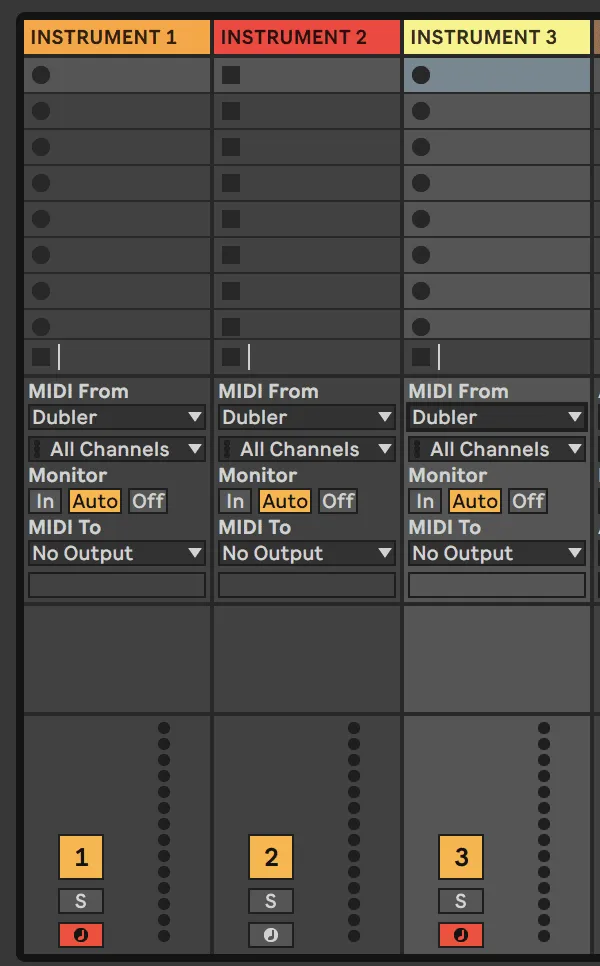
This is a very simple one but really useful with Dubler. Let’s say that you have three different instruments loaded on three separate MIDI channels - a bass, a lead synth and a pad - and you want to perform all three with Dubler (separately or all at once!)
The live controller makes this easy because you can record-arm the channels by clicking the record-arm buttons. You can even shift-click to record-arm multiple channels at the same time. As a result you’d be able to switch between which instruments you are performing with Dubler at the click of a button.
Live Technique 2 - Live Looping In Session View
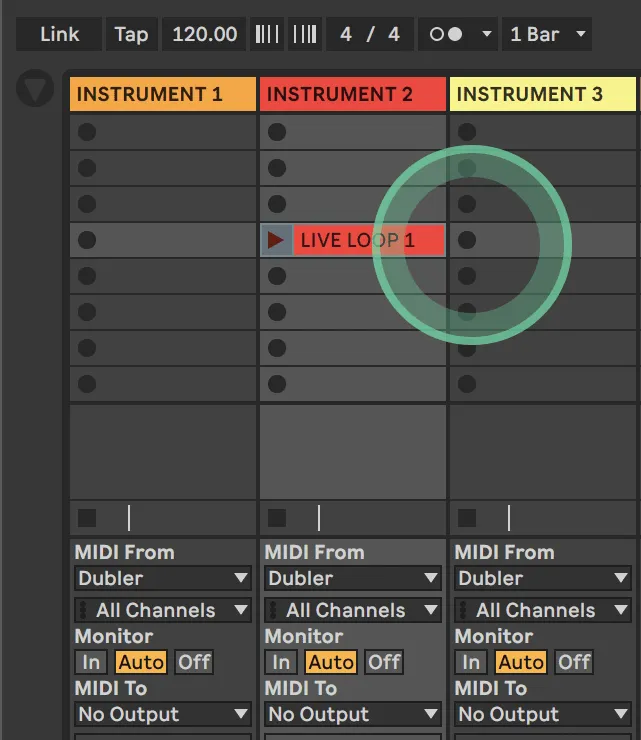
Ableton’s Global Quantize makes it so that every time you record a clip or start a clip in the Session View, it comes in perfectly on the next bar. This function is all you need to do live looping with clips. For example at 4:40 in our video we arm a percussion drum kit and sing triggers to live loop a conga pattern.
All you have to do is make sure to record-arm the clip, press one of the clip slots before the start of the next bar (this will start recording) and then press the same clip slot again before the bar you want it to start looping from. If you press the clip slot to stop the recording too late it won’t loop from where you want it to so this definitely takes some practice!
Live Technique 3 - Record Quantization
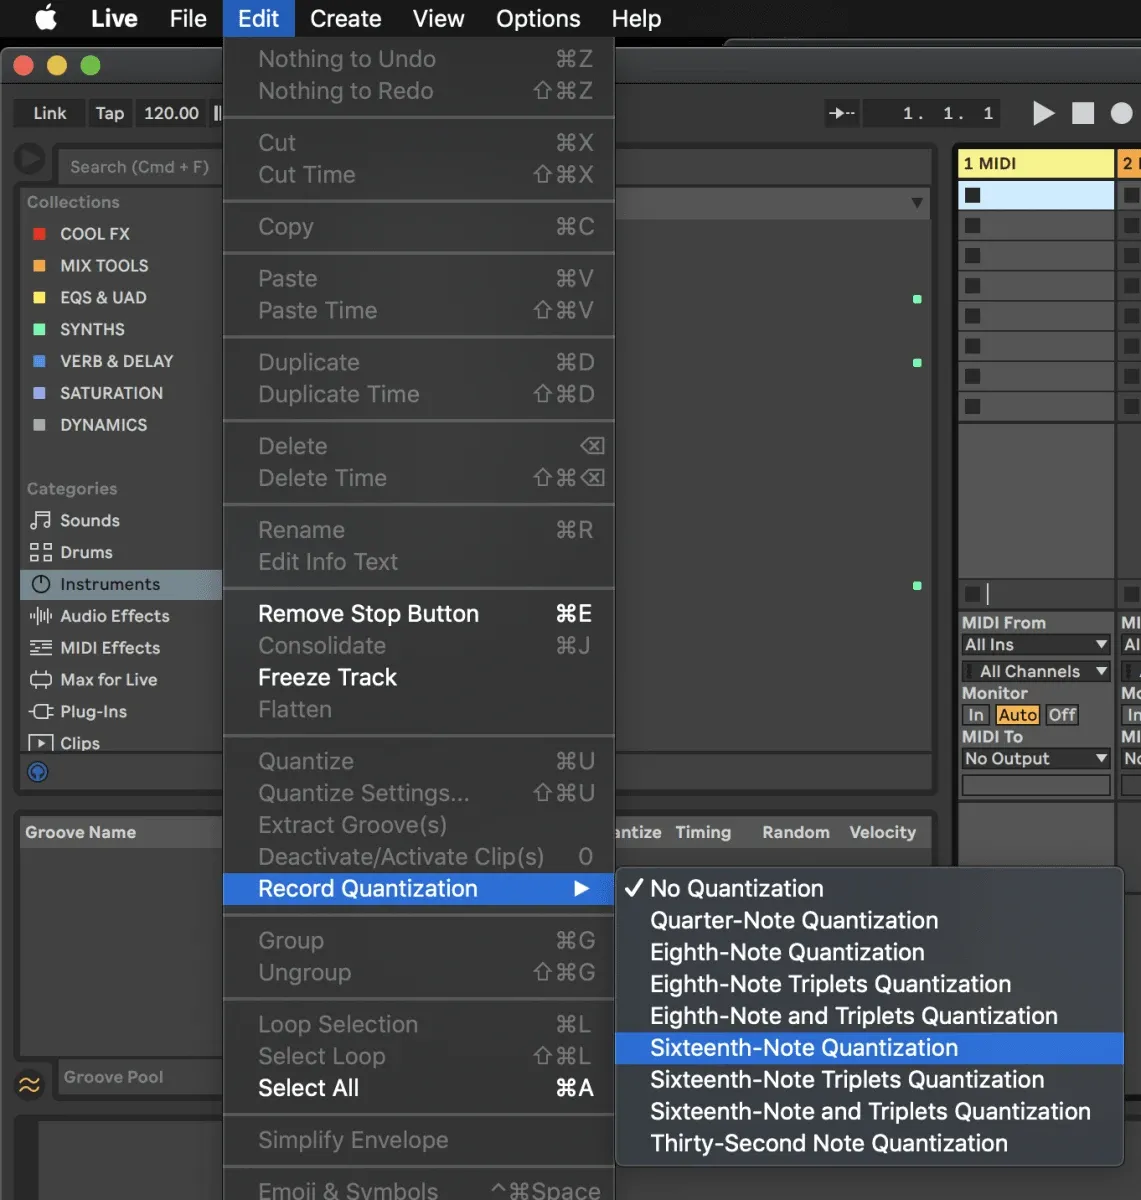
Ableton has a handy feature called Record Quantization that can automatically quantize any clips you record while performing. This is very useful during live performances, especially with drums! The feature is under the Edit menu as shown in the picture below. We tend to leave the setting at Sixteenth-Note Quantization.
Live Technique 4 - MIDI Mapping Knobs and Vowels
At 05:13 in the video we demonstrate some live effects processing by means of MIDI mapping. Our live controller has eight knobs designed for MIDI mapping and we mapped one of them to the Auto Filter device on the master channel. Specifically, we mapped it to the Cutoff Frequency to be able to do a DJ-esque high-pass, cutting the low bassy frequencies to build tension and then bringing them back.
With MIDI mapping the sky is the limit and you can also map parameters on individual channels to control effects on each of your instruments.
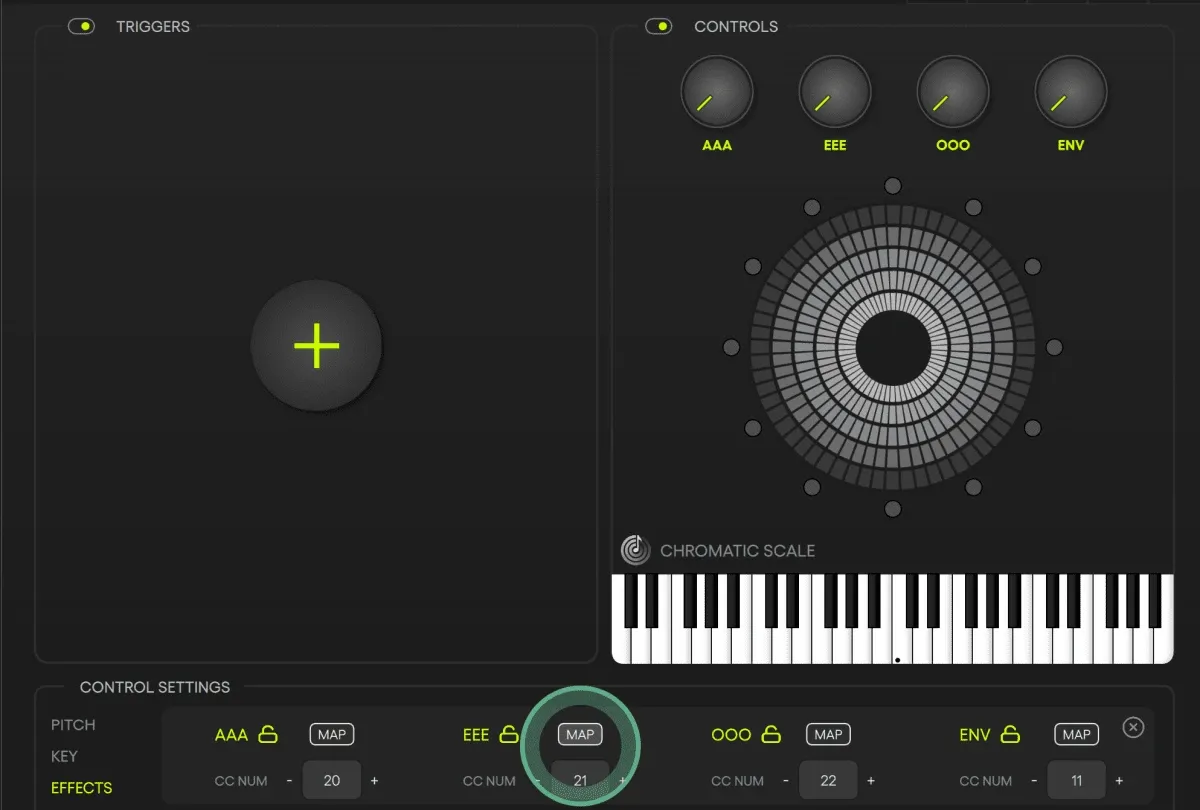
Dubler also provides the additional option of vowel MIDI mapping, as we demonstrate at 06:52 in the video. In this example, we mapped EEE in Dubler to the Eventide Undulator tremolo effect’s ribbon parameter that controls how much of the effect is dialed in. As a result, we get more tremolo when emphasizing the EEE syllable while singing.
For more examples and detailed walkthroughs about MIDI mapping vowels, be sure to check out this video in which we push vowel MIDI mapping to the max with Eventide’s new H9-series plug-ins.
Live Technique 5 - Using Multiple Dubler Profiles
This is a scenario in which you would have to use your mouse but switching Dubler profiles can truly help manage a live performance. The first reason is songs with different keys. For example, let’s say the first song of your performance is in A minor but the second is in B minor. To make sure you stay in the correct scale while performing with Dubler you’ll need to switch from A minor to B minor in Dubler before starting the second track. This process will be much faster if you have a separate profile for each track with all of the correct keys and note restrictions programmed in advance!
Having a separate profile for each song will also speed up the process of switching between triggers and pitch control. In songs where you don’t perform triggers, you can simply set triggers to be off in that song’s Dubler profile, for example.
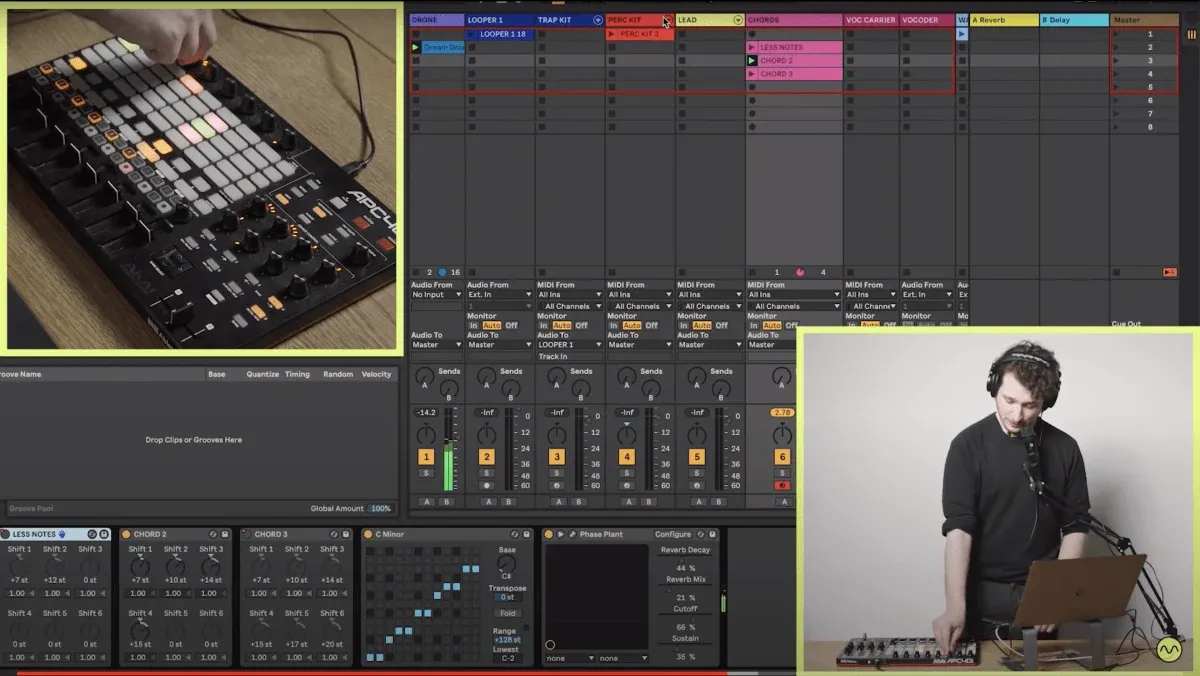
Live Technique 6 - Using Ghost Clips
Ghost clips are pre-programmed MIDI clips on MIDI channels that do not contain any note or pitch information. They are instead used for live automation! Let’s take a look at how to use them.
In our example at the eight minute mark in the video we have a pad sound with three different Chord MIDI devices that all contain different chord shapes. If these were all active at the same time the notes would be all over the place so we want to be able to toggle through them, changing chord patterns as we sing in notes with Dubler.
To be able to do this we added three empty ghost clips in session view and in each clip we automate the chord devices to be on or off. For example in the top one we have the ‘Chord 2’ and ‘Chord 3’ devices off and the ‘Less Notes’ device on. This means that when we launch that clip during our performance we’ll be sure that we’re using the ‘Less Notes’ device.
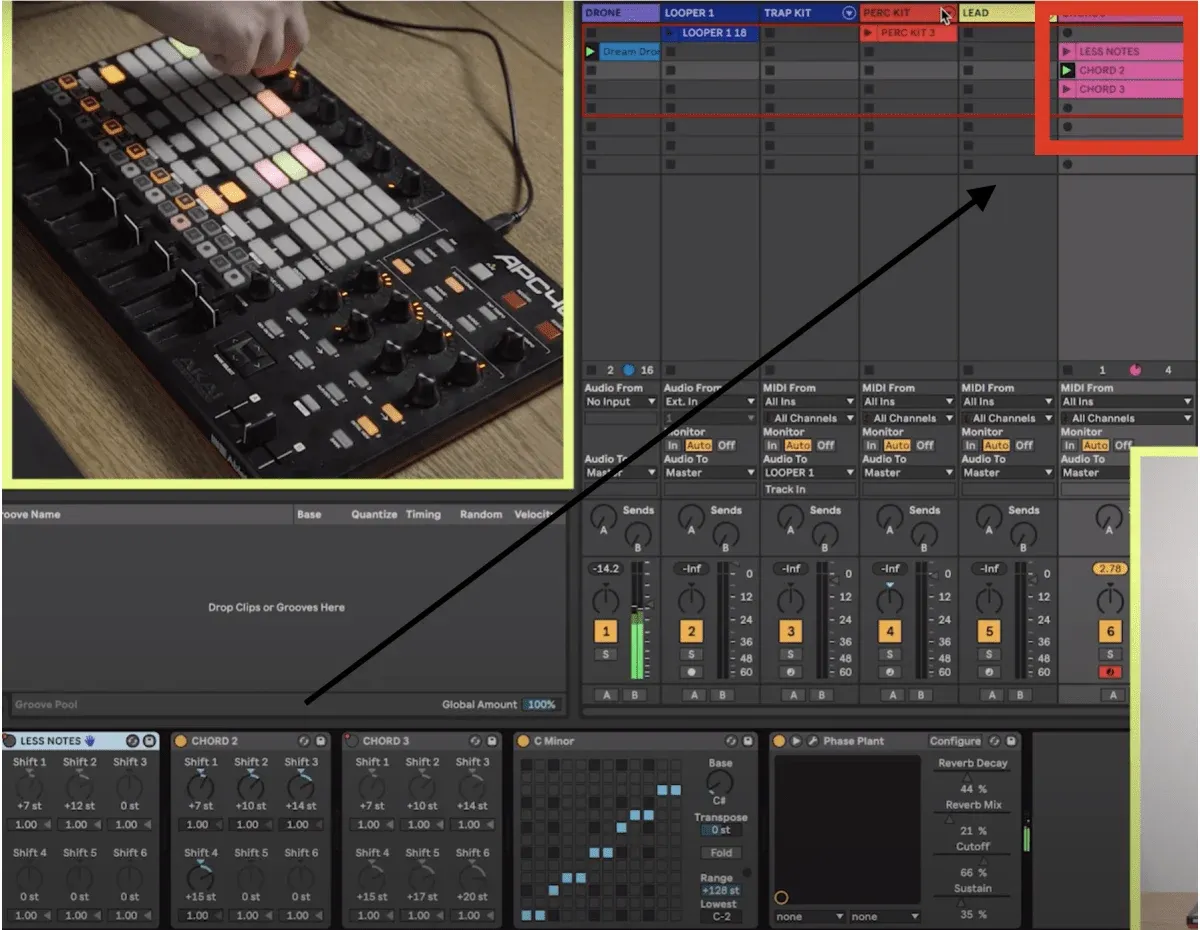
To do automation within MIDI clips all you have to do is double click the clip, enable the envelope menu by clicking the line with two circles at the very bottom left of the screen and then find the “Device On” envelope for whichever device you want to turn on and off. If you want the device to be on when you launch the clip, set the envelope to be on within the clip.
You can do this with any effects or plug-ins you have loaded on the MIDI channel.

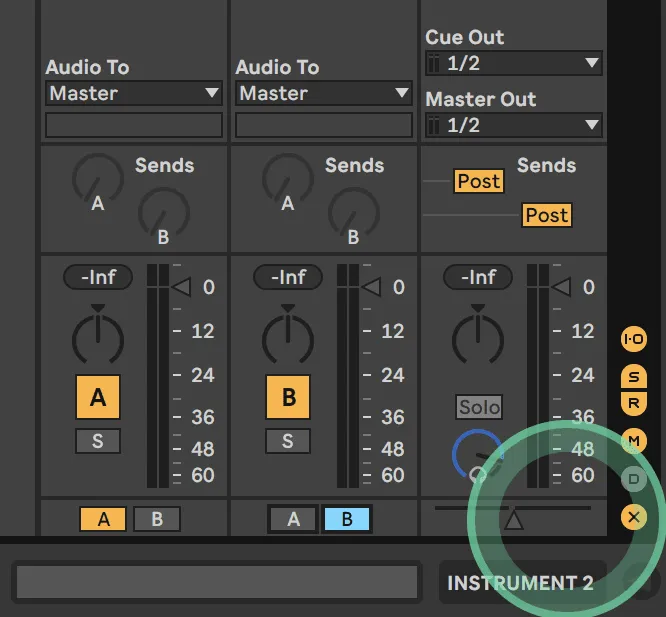
Live Technique 7 - The Crossfader
Live has a well-hidden crossfader feature that reveals itself when you press the ‘X’ at the very bottom-right of the interface. When pressed you get a horizontal fader at the bottom-right and every channel gets an A and B button. These buttons allow you to place your channels in an A group or a B group and the crossfader then allows you to mix between the two.
The AKAI MIDI controller has a physical version of this crossfader, along with an A and B button on every channel to make it easier for to group the sounds.
In the tenth minute of the video we put our lead synth instrument in A and our pad instrument in B, we record-arm both channels so we can send MIDI via Dubler to both instruments at once, and then we mix between them using the cross-fader while performing.
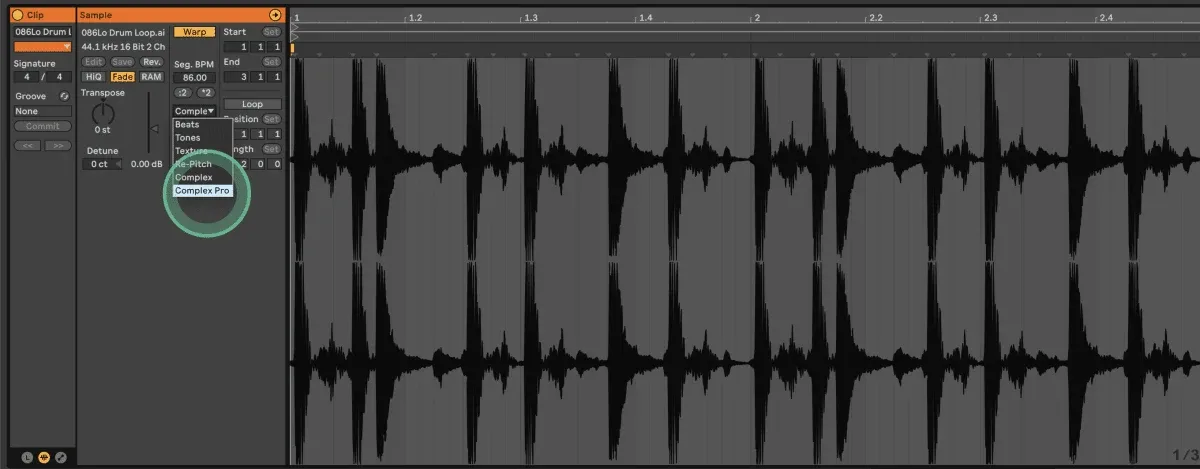
Live Technique 8 - Warping External Loops to Your BPM
Performing every single part on your own is hard so we definitely recommend using some pre-prepared loops. Improvising with Dubler becomes much easier when you’re singing into a musical context.
To import audio clips drag them into an empty clip slot on an audio channel in your project. The key is knowing the original BPM of the loop you drag in. This will allow you to use Ableton’s warp feature that adapts any loop to whichever BPM you are working with.
To warp a clip, double clip your audio clip, enable warp and enter the original BPM of the clip in the Seg. BPM box. Select the ‘Complex Pro’ warp algorithm in the below dropdown list and voila! The clip should now play correctly at every tempo you set your project to.
It’s fun to change the tempo live with warped clips playing, as we demonstrate at 13:05 in the video.
Live Technique 9 - Follow Actions
Our final technique is again aimed at working with pre-pared clips and loops that will make it easier to provide a musical background while improvising with Dubler.
Follow actions are commands for clips that you can access by pressing the ‘L’ in the bottom left corner in the clip view - which you see after double clicking a clip. Then you can select the desired action by clicking the dropdown list under “Follow Action.”
Some examples of these follow action commands as words would be “switch to the clip below after 1 bar,” “switch to a random clip after three 16th-notes,” go back to the clip at the top after reaching the end of the lowest clip.”
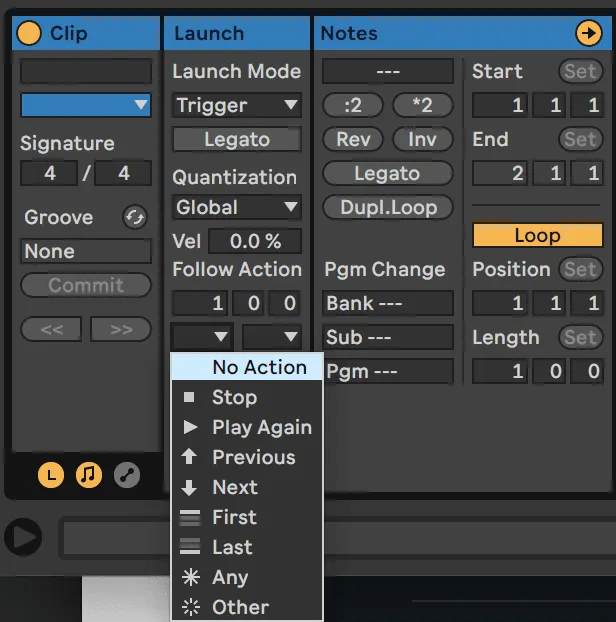
In our example in the video at 13:45 we have two audio clips loaded on an audio channel and we want the second clip to play automatically after the first clip plays for eight bars. To do this we set the timing to 8-0-0 (this is eight bars) and we set the Follow Action to ‘Next.’ Next just means that the next clip below will start to play.
This can be very helpful for managing a live set and means that you don’t have to launch every single clip! You can have a whole song planned out in clips that are programmed via follow actions to launch one after the other. You can also use follow actions on ghost clips with automation - like those we looked at in the sixth technique.
We hope these tips are helpful and if you have any questions please leave a comment and we’ll get back to you!